Unlock Remote IoT Control: SSH On Windows 10 Made Easy!
Ever found yourself miles away from your IoT devices, needing to tweak a setting or diagnose a problem? Remote management using SSH is not just a luxury; it's the cornerstone of efficient IoT management, transforming the way we interact with our connected devices.
Imagine controlling your Raspberry Pi from a caf in Paris, or updating your smart home sensors from a business trip in Tokyo. This level of control is entirely within reach, and it all starts with understanding how to leverage SSH on your Windows 10 machine. The beauty of SSH (Secure Shell) lies in its ability to create a secure, encrypted connection between your computer and your IoT device, regardless of their physical location. This means you can confidently manage your devices from anywhere in the world, knowing that your connection is secure and reliable. Whether you're a seasoned tech professional or just starting your journey into the world of IoT, mastering SSH is a game-changer.
| Category | Details |
|---|---|
| Technology | Secure Shell (SSH) for IoT Device Management on Windows 10 |
| Operating System | Windows 10 |
| Key Concept | Remote access and management of IoT devices |
| Protocol | SSH (Secure Shell) - a cryptographic network protocol |
| Benefits | Secure connection, remote control, flexibility in managing devices from any location |
| Target Audience | Tech enthusiasts, IT professionals, IoT developers |
| Application Scenarios | Smart home automation, industrial IoT, remote device troubleshooting and updates |
| Alternative Access Methods | Windows Device Portal (WDP), Remote Desktop Protocol (RDP) (less common for IoT) |
| Security Considerations | Strong passwords, SSH key authentication, trusted IP addresses |
| Further Resources | Microsoft Windows IoT Core Documentation |
This comprehensive guide will demystify the process of setting up a free IoT SSH connection on your Windows 10 machine, providing you with the knowledge and tools to take full control of your IoT ecosystem. We'll navigate the intricacies of configuring your system, securing your connections, and troubleshooting common issues, ensuring that you're well-equipped to manage your devices effectively from anywhere in the world.
- Shannon Sharpe Married Decoding His Relationship Status History
- Culver City Dmv Tips Reviews Your Guide To La Dmv Success
Before diving into the specifics, let's address the fundamental question: Why SSH? In today's world, where IoT devices are becoming increasingly integral to our lives, from smart homes to industrial automation, the ability to remotely access and manage them securely is paramount. SSH offers a robust and reliable solution, providing an encrypted channel for communication that protects your data from prying eyes. Furthermore, SSH is lightweight and efficient, making it ideal for resource-constrained IoT devices. While other remote access methods exist, such as Remote Desktop Protocol (RDP) or proprietary cloud platforms, SSH offers a unique combination of security, flexibility, and control.
Prerequisites for SSH on Windows 10
Before you can SSH into an IoT device on Windows 10, there are a few prerequisites you need to meet. Firstly, you'll need a Windows 10 machine with a stable internet connection. Ensure that your Windows 10 installation is up-to-date, as the latest versions include improved SSH support. Secondly, you'll need an IoT device running a compatible operating system, such as Linux (which is common for Raspberry Pi and similar devices). This IoT device must be connected to the same network as your Windows 10 machine or accessible via the internet. Finally, you'll need an SSH client on your Windows 10 machine. While Windows 10 now includes a built-in SSH client, you can also use third-party clients like PuTTY or MobaXterm.
- Fact Check Barron Trump Singing On Agt The Ai Hoax
- Blue Ivys Bold Move Independence Drama Explained More
Setting up SSH on Windows 10
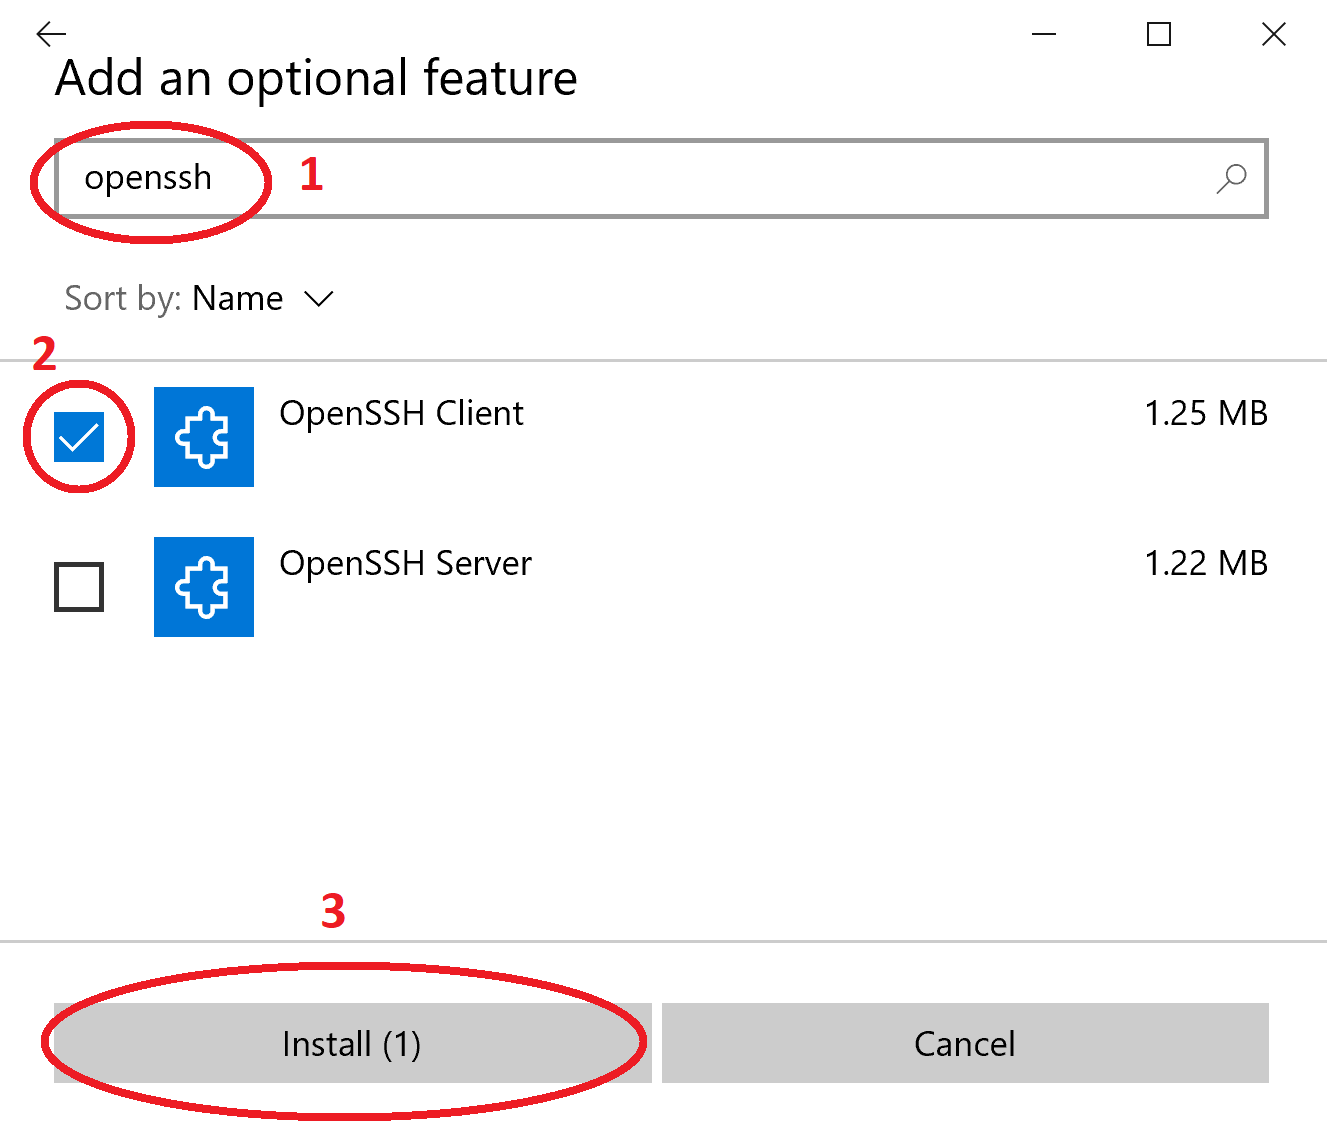
The process of setting up SSH on Windows 10 is relatively straightforward. The first step is to enable the SSH client. To do this, open the Settings app, navigate to Apps > Apps & features, then click on "Optional features". Click "Add a feature" and search for "OpenSSH Client". Select it and click "Install". This will install the necessary components for SSH functionality. Once the installation is complete, you can access the SSH client from the command line or PowerShell.
Next, you need to configure the SSH server on your IoT device. This typically involves enabling the SSH service and setting up user accounts with appropriate permissions. The exact steps will vary depending on the operating system running on your IoT device. For example, on a Raspberry Pi running Raspberry Pi OS, you can enable SSH by opening the Raspberry Pi Configuration tool, navigating to the Interfaces tab, and enabling the SSH service. You should also set a strong password for the default user account (usually "pi") or create a new user account with SSH access.
Connecting to Your IoT Device
Now that you've set up SSH on Windows 10 and configured the SSH server on your IoT device, it's time to connect. Open a command prompt or PowerShell window on your Windows 10 machine. To connect to your IoT device, use the following command:
ssh username@device_ip_address
Replace "username" with the username of the account you want to use to log in to the IoT device, and replace "device_ip_address" with the IP address of your IoT device. For example, if your username is "pi" and your device IP address is "192.168.1.100", the command would be:
ssh pi@192.168.1.100
When you run this command, you'll be prompted to enter the password for the specified user account. After entering the password, you'll be logged in to the IoT device via SSH, and you can start executing commands.
Securing Your SSH Connection
While SSH provides a secure encrypted connection, it's essential to take additional steps to enhance security. One of the most important steps is to use a strong password for authentication. A strong password should be at least 12 characters long and include a mix of uppercase letters, lowercase letters, numbers, and symbols. Avoid using easily guessable passwords, such as your name, birthday, or common words.
A more secure alternative to password authentication is to use SSH key authentication. With SSH key authentication, you generate a pair of cryptographic keys: a private key and a public key. You store the private key on your Windows 10 machine and copy the public key to the IoT device. When you connect to the IoT device via SSH, the SSH client uses the private key to authenticate, without requiring you to enter a password. SSH key authentication is much more secure than password authentication because it's virtually impossible for an attacker to guess your private key.
To set up SSH key authentication, you can use the ssh-keygen command on your Windows 10 machine. Open a command prompt or PowerShell window and run the following command:
ssh-keygen -t rsa -b 4096
This will generate a new RSA key pair with a key size of 4096 bits. You'll be prompted to enter a file name for the key pair and a passphrase. The passphrase is used to encrypt the private key, providing an additional layer of security. After generating the key pair, you need to copy the public key to the IoT device. You can do this using the ssh-copy-id command:
ssh-copy-id username@device_ip_address
Replace "username" and "device_ip_address" with the appropriate values. You'll be prompted to enter the password for the user account on the IoT device. After running this command, the public key will be copied to the ~/.ssh/authorized_keys file on the IoT device. From now on, you can connect to the IoT device via SSH without entering a password, as long as you have the private key on your Windows 10 machine.
Another important security measure is to restrict SSH access to specific IP addresses. By default, the SSH server on your IoT device will accept connections from any IP address. However, you can configure the SSH server to only accept connections from your computer's IP address or from any trusted IP address. This step ensures that only authorized devices can SSH into the IoT device, improving security. To restrict SSH access, you need to edit the SSH server configuration file, which is typically located at /etc/ssh/sshd_config on Linux-based systems. Open this file with a text editor and add or modify the following line:
AllowUsers username@ip_address
Replace "username" with the username of the account you want to allow SSH access for, and replace "ip_address" with the IP address of the device you want to allow SSH access from. You can specify multiple users and IP addresses by separating them with commas. After making these changes, save the configuration file and restart the SSH server for the changes to take effect.
Managing and Monitoring Your IoT Devices
Once you've established a secure SSH connection to your IoT device, you can start managing and monitoring it remotely. SSH provides a powerful command-line interface that allows you to execute commands, transfer files, and manage processes on the IoT device. You can use SSH to troubleshoot issues, update software, configure settings, and perform a wide range of other tasks.
For example, you can use SSH to monitor the CPU usage, memory usage, and network traffic on your IoT device. This can help you identify performance bottlenecks and diagnose problems. You can also use SSH to manage processes running on the IoT device. You can start, stop, and restart processes, and you can view the status of running processes. Furthermore, you can use SSH to transfer files between your Windows 10 machine and the IoT device. This can be useful for uploading new software or downloading log files.
In addition to the command-line interface, you can also use graphical tools to manage your IoT devices remotely via SSH. For example, you can use a tool like MobaXterm to create a graphical SSH session with your IoT device. MobaXterm provides a user-friendly interface for managing files, editing text, and executing commands on the IoT device. It also supports X11 forwarding, which allows you to run graphical applications on the IoT device and display them on your Windows 10 machine.
Alternatives to SSH
While SSH is a powerful and versatile tool for remote access to IoT devices, it's not always the best solution for every situation. In some cases, other remote access methods may be more appropriate. For example, if you need to provide remote access to a user who is not technically savvy, a graphical remote desktop solution like RDP may be a better choice. RDP provides a user-friendly interface that allows users to interact with the IoT device as if they were sitting in front of it.
Another alternative to SSH is to use a cloud-based IoT platform. Cloud-based IoT platforms provide a centralized interface for managing and monitoring your IoT devices. These platforms typically offer features such as device management, data storage, data analytics, and remote control. While cloud-based IoT platforms can be convenient, they also have some drawbacks. For example, they typically require a paid subscription, and they may not provide the same level of control and flexibility as SSH.
Microsoft does offer a few tools to make accessing IoT devices easy, such as Windows Device Portal (WDP). WDP allows you to configure and manage your IoT device remotely over a local network. WDP can be reachable via the local IP of the IoT device. Additional information on WDP on IoT can be found in Microsoft's documentation. Windows 10 IoT Core is a version of Windows 10 optimized for smaller devices, with or without a display, that run on both ARM and x86/x64 devices.
Ultimately, the best remote access method will depend on your specific needs and requirements. If you need a secure, flexible, and powerful solution for managing your IoT devices remotely, SSH is an excellent choice. However, if you need a more user-friendly or cloud-based solution, other options may be more appropriate. Consider your specific needs and requirements carefully before choosing a remote access method.
Troubleshooting Common SSH Issues
While setting up and using SSH is generally straightforward, you may encounter some issues along the way. Here are some common SSH issues and how to troubleshoot them:
- Connection Refused: This error typically indicates that the SSH server is not running on the IoT device or that the firewall is blocking SSH connections. To troubleshoot this issue, first ensure that the SSH server is running on the IoT device. You can check this by running the command
sudo systemctl status sshon the IoT device. If the SSH server is not running, start it by running the commandsudo systemctl start ssh. If the SSH server is running, check the firewall settings to ensure that SSH connections are allowed. On Linux-based systems, you can use theufwcommand to manage the firewall. - Authentication Failed: This error typically indicates that you're using the wrong username or password to log in to the IoT device. To troubleshoot this issue, double-check that you're using the correct username and password. If you're using SSH key authentication, ensure that the private key is on your Windows 10 machine and that the public key is in the
~/.ssh/authorized_keysfile on the IoT device. - Network Unreachable: This error typically indicates that your Windows 10 machine cannot reach the IoT device. To troubleshoot this issue, first ensure that your Windows 10 machine and the IoT device are connected to the same network. You can check this by pinging the IoT device from your Windows 10 machine. Open a command prompt or PowerShell window and run the command
ping device_ip_address. If the ping fails, there may be a network connectivity issue. - Permission Denied: This error typically indicates that you do not have the necessary permissions to perform a specific task on the IoT device. To troubleshoot this issue, ensure that you're logged in to the IoT device with an account that has the necessary permissions. You may need to use the
sudocommand to run commands with elevated privileges.
By following these troubleshooting steps, you can resolve most common SSH issues and ensure that you can connect to and manage your IoT devices remotely.
Tips for Using SSH IoT from Anywhere on Windows 10
Here are some additional tips for using SSH IoT from anywhere on Windows 10:
- Use a strong password or SSH key for authentication to enhance security. This is the most important security measure you can take to protect your IoT devices from unauthorized access.
- Keep your SSH client and server software up-to-date. Software updates often include security patches that can protect your systems from vulnerabilities.
- Use a VPN (Virtual Private Network) to encrypt your internet traffic. A VPN can provide an additional layer of security when connecting to your IoT devices from a public Wi-Fi network.
- Consider using a dynamic DNS service if your IoT device has a dynamic IP address. A dynamic DNS service will automatically update the IP address associated with your device's hostname, so you can always connect to it, even if its IP address changes.
- Use a port forwarding rule on your router to forward SSH traffic to your IoT device. This is necessary if your IoT device is behind a router and you want to connect to it from outside your local network.
- Monitor your SSH logs for suspicious activity. SSH logs can provide valuable information about who is connecting to your IoT devices and what they are doing.
By following these tips, you can ensure that your SSH IoT connections are secure and reliable, and that you can manage your devices effectively from anywhere in the world.
In conclusion, mastering SSH for IoT device management on Windows 10 opens a world of possibilities. It's a powerful, secure, and flexible way to manage your connected devices from anywhere in the world. By following the steps outlined in this guide, you can establish a reliable and secure connection to your IoT devices, and take full control of your IoT ecosystem. Remember to prioritize security by using strong passwords or SSH keys, keeping your software up-to-date, and monitoring your SSH logs. With the power of SSH and Windows 10, you can transform how you interact with your connected world.
- 1883 Finale Tim Mcgraw Faith Hills Emotional Reactions Details
- Stephen A Smiths Daughter Heartbreak Resilience Legacy
Securely Connecting To IoT Devices Via VPC With SSH On Windows 10
![How to Access IoT Devices Remotely with SSH [6 Easy Steps]](https://www.trio.so/blog/wp-content/uploads/2024/10/Access-IoT-Devices-Remotely-Using-SSH.webp)
How to Access IoT Devices Remotely with SSH [6 Easy Steps]

Secure Your IoT Devices With RemoteIoT SSH The Ultimate Guide
